I have recently been able to get my hands on an instance of VMware’s vRealise Automation 8 platform and have been planning around with the new (but not soo new) Terraform Cloud Assembly Blueprints. This is a feature that was introduced into vRA 8.2, enabling vRA to natively pull Terraform HCL deployment files from a Git repo and execute them all within vRA with no additional infrastructure required.
I found this to be really cool and really expands the possibilities with vRA and what it can do.
For those whom are not familiar with Terraform, please check out HashiCorp’s website to learn and play with it. Terraform in a nutshell is an open-source infra as code tool, which allows you to provision, manage, and delete resources in almost any cloud. As it is an opensource community, users have the ability to create their own integrations to 3rd party platforms (known as providers) enabling it to be very versatile and cloud agnostic allowing you to build stuff in AWS, Azure, GCP, VMware, Kubernetes, etc… all from one set of code.
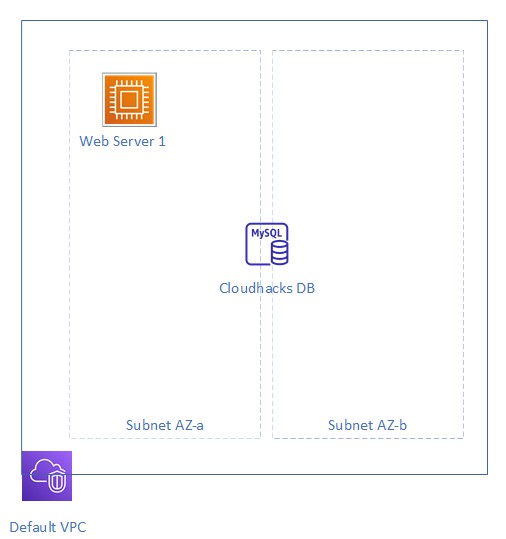
Today I want to look at using vRA and Terraform to deploy a very simple two tier solution into AWS. We will look at creating an Ubuntu EC2 and MySQL RDS instance into an existing AWS Account all via vRA without needing us to do any other work. Below is a quick diagram of what we are going to try deploy today.
Although you can use Terraform on its own and it works great. The nice benefit I found by using vRA to deploy your Terraform template is that, not only can you front your deployment code with a nice easy to user interface for inputting variables. But also you don’t really need to worry about deploying any infrastructure like Terraform CLI tools or Terraform entrprise, all you need is a GitHub account and some knowledge on Terraform HCL to create a deployment file.
For this blog I am going to break this into five separate sections:
- Creating EC2 instance via TF
- Creating RDS instance via TF
- Adding GitHub integration into vRA
- Creating TF Blueprint
- Testing TF deployment
What you are going to need to run through this are:
- An AWS Account (with an existing vpc and subnet, in this demo going to use the default vpc AWS provision for us)
- GitHub account (or any Git supported repo platform)
- An instance of vRA 8.2 or vRA Cloud (I will be using vRA cloud)
Creating EC2 Instance via TF
Ok soo to create a basic EC2 instance. With Terraform because it is multi cloud platform, we first need to define which provide we are using, in our case we are talking to AWS, soo our provider will be AWS. In addition to this we need to define which version of the provider and also the region we are deploying into:
provider "aws" {
    version = "2.69.0"
    region  = "eu-west-2"
  }
Next we will have a look at the terraform documentation on how to provision an EC2 instance here. To create an EC2 instance we require to define a minimum of 3, the ami, instance_type and subnet_id. Now the subnet_id we can pull as an input variable, the instance_type although we could define as another variable, to make things simple lets hard code it. Same as the ami we will set that to use an ubuntu image
data "aws_ami" "ubuntu" {
    most_recent = true

    filter {
      name   = "name"
      values = ["ubuntu/images/hvm-ssd/ubuntu-focal-20.04-amd64-server-*"]
    }

    filter {
      name   = "virtualization-type"
      values = ["hvm"]
    }

    owners = ["099720109477"] # Canonical
  }

  resource "aws_instance" "web" {
    ami           = data.aws_ami.ubuntu.id
    instance_type = "t3.micro"
    #subnet_id is specific to my VPC. Change it!
    subnet_id = var.subnetid

  }
The above code will create a simple ubuntu VM in our defined subnet, we can off course get more fancy based on the documentation but lets keep it simple for now. In addition to the above code we also need to define the variable for subnet.
variable "subnetid" {
    type        = string
    description = "Subnet Id"
  }
Creating RDS instance via TF
Now we have the EC2 instance defined, lets in the same file and create the RDS instance, using terraform documentation again (can get from here). For RDS we need to define a bit more information. Items such as the allocated storage, engine type, db name, username/password and the instance type.
One thing you will notice in the documentation is if you want to define your subnets you will need to define a subnet group, soo lets start off with doing that:
  resource "aws_db_subnet_group" "_" {
    name       = "${var.name}-subnet-group"
    subnet_ids = [var.subnetid,var.subnetid2]
  }
In the above we have 3 variables, one is just an identifier name which is also used to name the RDS instance, the others are the two subnet ids which the RDS instance will sit on. The first subnet we can use the same input variable from the EC2 resource variable. The other one we will define a little bit later when we define all the variables for RDS.
Now we have the subnet group defined lets create our RDS instance. As we are planning on building a simple mySQL instance we can define some basic values such as engine and engine version, the starting allocated space and parameter group name. We are also putting the subnet_group_name from the resource we created earlier. Below you can see we have hard coded many of the values just to make it easier for us to build, other are inputs such as the username and the db details.
resource "aws_db_instance" "mysql_db" {
    allocated_storage    = 10
    engine               = "mysql"
    engine_version       = "5.7"
    instance_class       = "db.t3.micro"
    name                 = var.name
    username             = var.username
    password             = var.password
    parameter_group_name = "default.mysql5.7"
    publicly_accessible     = false
    skip_final_snapshot  = true
    db_subnet_group_name    = aws_db_subnet_group._.id
  }
Now lets define our variables, as we already defined the subnet variable when we wrote out the EC2 instance, besides that we need to create new variables for username, password, name and subnet_2
variable "subnetid2" {
    type        = string
    description = "Subnet Id2"
  }

  variable "name" {
    type        = string
    description = "rds name"
  }

  variable "username" {
    type        = string
    description = "dbusername"
  }

  variable "password" {
    type        = string
    description = "dbpassword"
  }
Lets save all this as a tf file main.tf and commit this to our Git repo. Here is an example of my TF file as a reference.
Adding GitHub and TF integration into vRA
OK now we have our Terraform deployment defined in GitHub lets reference our GitHub in our vRA instance. Please note I am using a cloud instance soo it may be slightly different if you are using an onprem version of vRA.
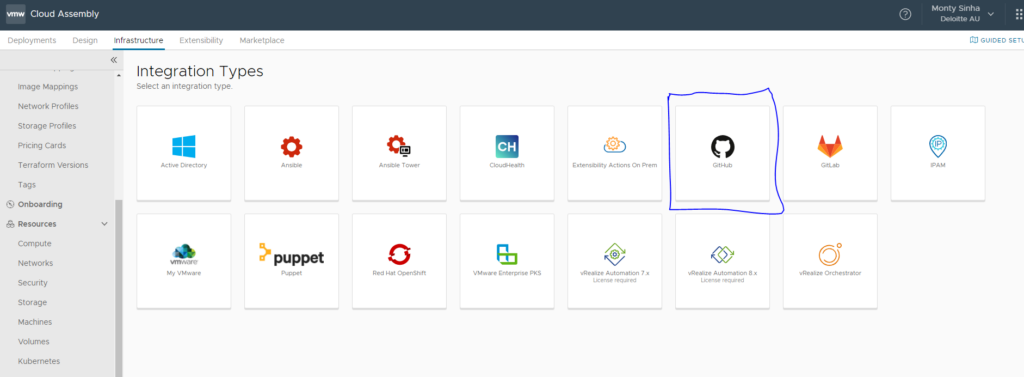
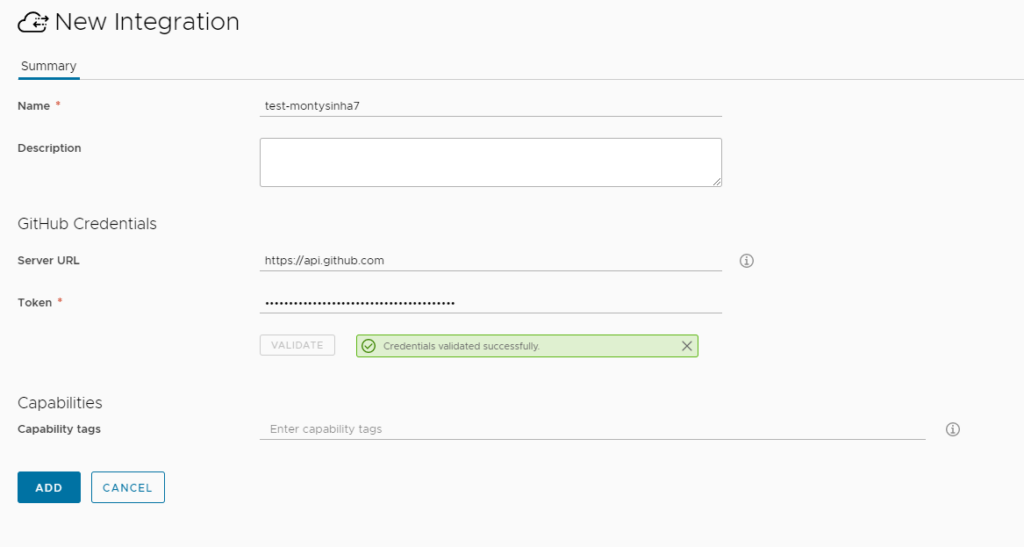
To add a GitHub Repo into vRA we need to login to Cloud Assemble and under Infrastructure and Integrations we will add a new GitHub integration:
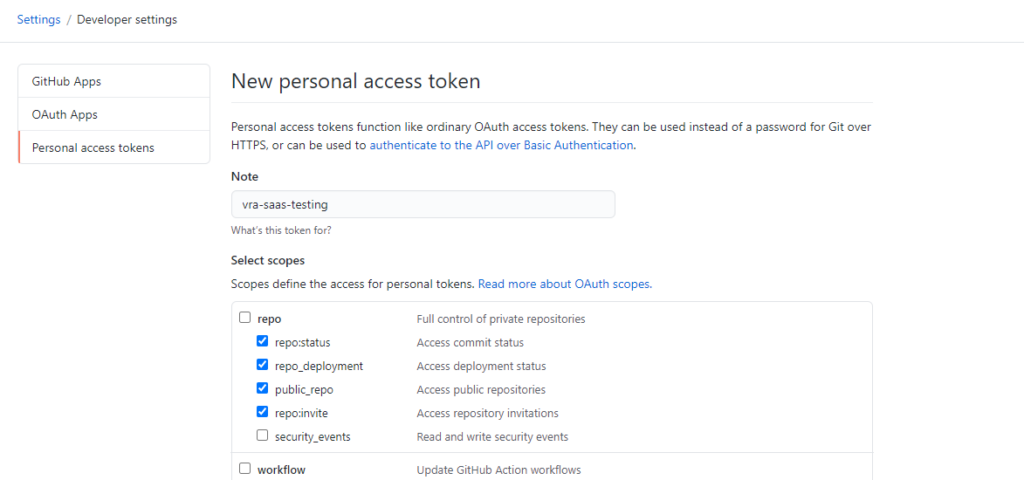
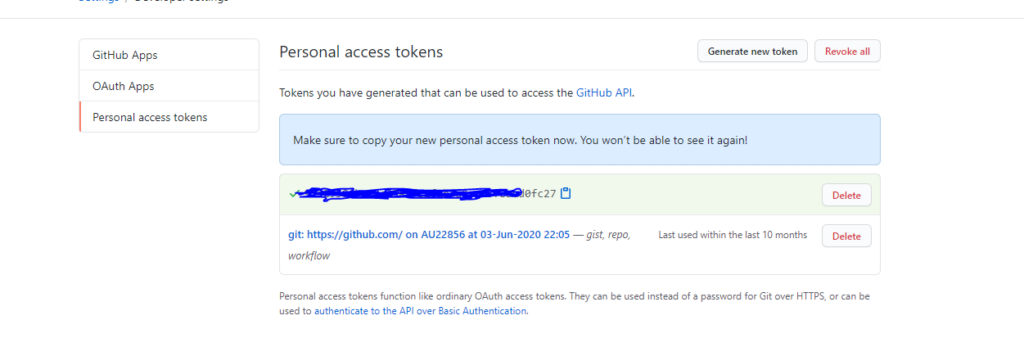
The next page will ask you to put in a name and a Token, the token you can get from your GitHub account. (Under Settings > Developer Settings Personal Access Tokens) give it a name and permissions minimum permissions to access Repo
Paste this into vRA Token validate and add the integration:
Once added you will just need to add it to an existing Project:

It will also ask you to add a repo and repo type, for me it was as per below:
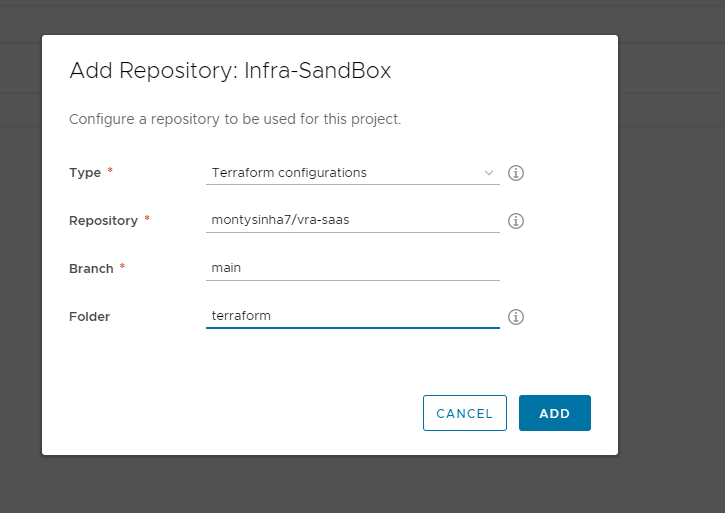
If your details are correct it should pick it all up.
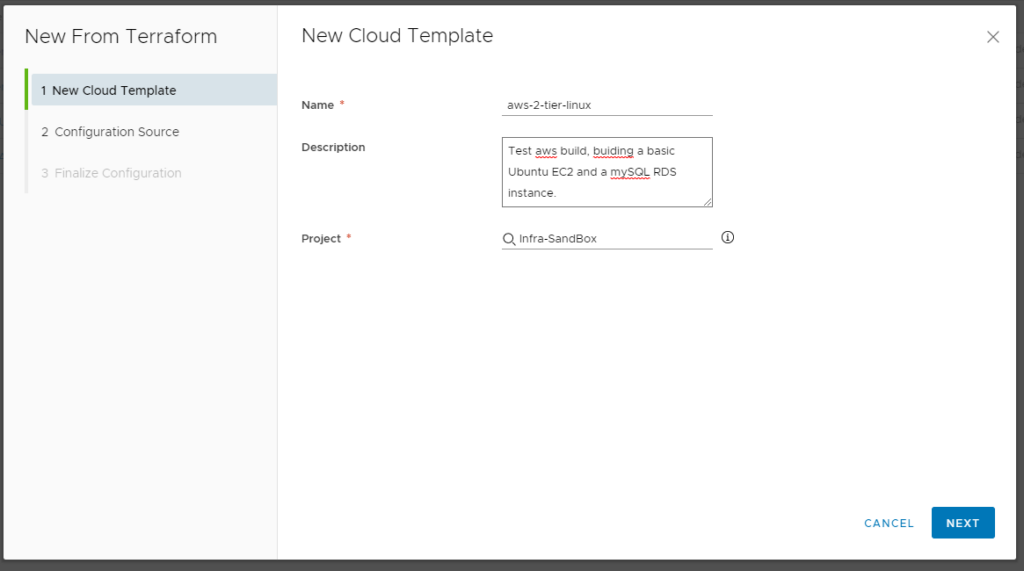
Creating TF Blueprint
Adding the Terraform Blueprint is very easy and quick, under Cloud Assemble and Design we will create a new Template from Terraform.

Give it a name and the project you wish to assign it to (Please insure that this project has an AWS Account associated to it).
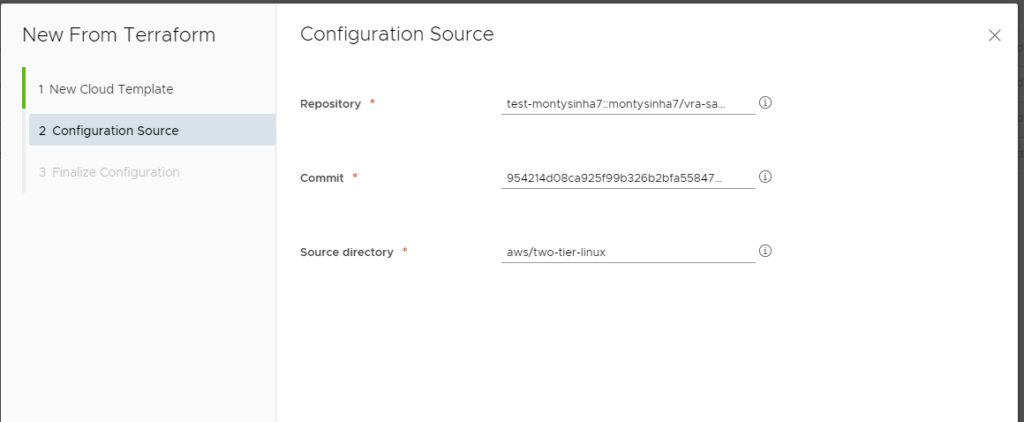
Next fill in your Repo and Commit (these should be available drop downs) and the directory your main.tf was created, it will attempt to validate the folder exists before the next button is available. If it fails it will give you an error.
vRA will auto pick up your variables and provider details, but be sure to set password as a sensitive variable:

Once happy with this run create and it will create the blue print template for you.
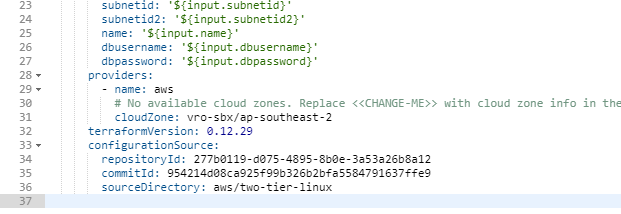
There is not much you get to see in the template unfortunately, but before you run a deploy there is one thing you will need to do, which is change the cloudZone under the provider section of the code and put in your cloudZone as per below:
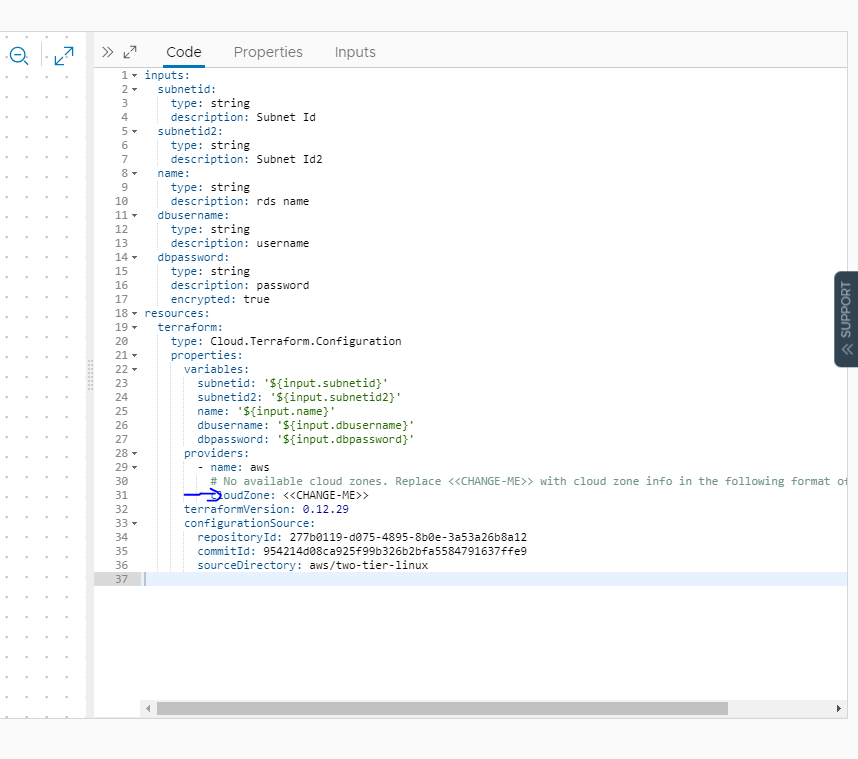
Change the <<CHANGE-ME>> to your AWS cloudzone name, in mycase it is called vro-sbx/ap-southeast-2
Alright lets try deploying this bad boy.
Testing TF deployment
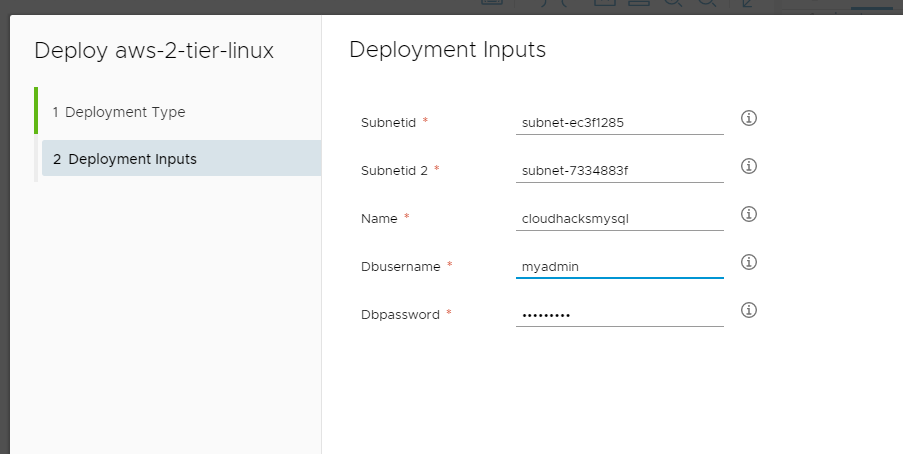
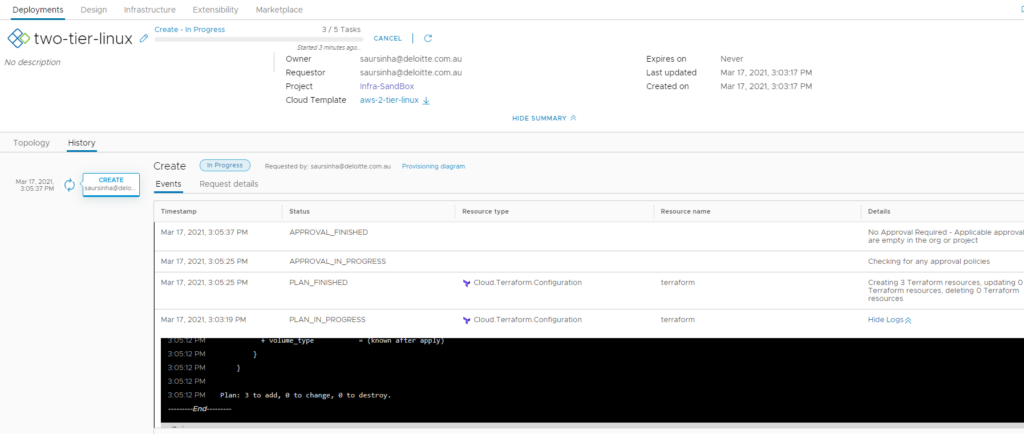
Now lets run deploy at the bottom of the template. Give it a deployment name, and in the input, define the subnet Ids from your AWS account (in my test case I am just using the default subnets AWS creates in each region), give your DB a name (must be alphanumerical only), a db user and password.
And hit deploy, under history of the request you can actually view the steps it has run and also terraform logs as they come:
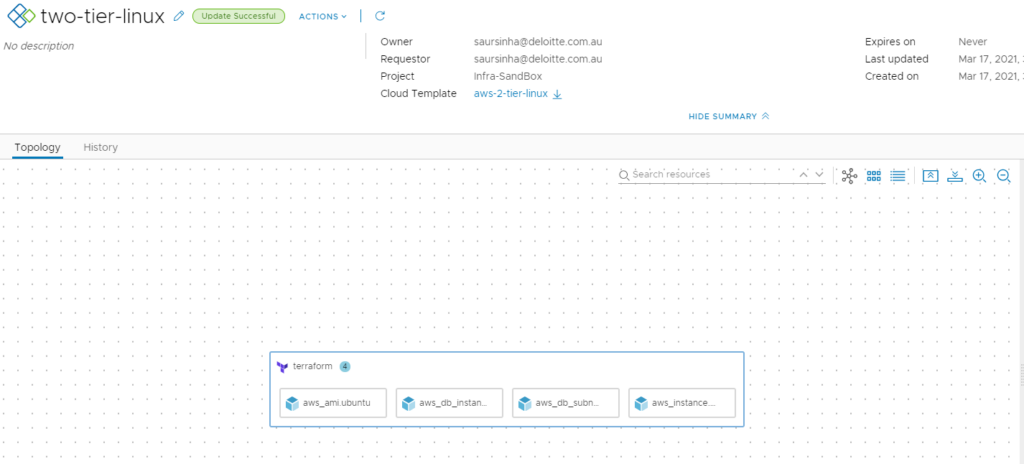
After a couple minutes it should be complete 😊, and checking AWS console I can see my new RDS instance and EC2 instance.
Hope you enjoyed this short run of using Terraforms and vRA to build into AWS, this is a very basic example but with this the possibilities are endless.