Containers has become the new Virtual Machines and has taken off in a big way with developers embracing the freedom, portability and agile nature of containers, and in many ways, they have left enterprise compliance and security to play catch up. There currently is a big gap in the security and compliance of containers mainly in large organisations as they try to learn this new technology.
The Kubernetes community have been working to try reducing the gap of security and compliance and as a result there have been several projects and practices which have come out. Once such project is Project Calico and Network Policies. Network Policies attempt to resolve the Zero Trust network model in this new world.
Network policies to put it simply defines firewall policies on a Namespace level which can be used to define network segmentation, based on Pods, Namespaces, CIDRs and Ports. It helps in implementing a true zero-trust micro segmented FW inside a Kubernates cluster.
Network Policies come pre-baked into Kubernetes however they require a plugin to be installed into the Cluster to enable the cluster to read the Network Policies. A very commonly used network Plugin is Calico.
Note, please do not confuse Calico Network Policies with Kubernetes Native Network Policies. These are as I learnt different things; Calico has its own definition of Network Policies compared to what Kubernetes comes out of the box. The Calico Network Policies are considered to be an extension of the Kubernetes Network Policy implementation adding additional features and support for other Kubernetes Endpoint types. In this Post we are only exploring the Kubernetes Native Network Policies.
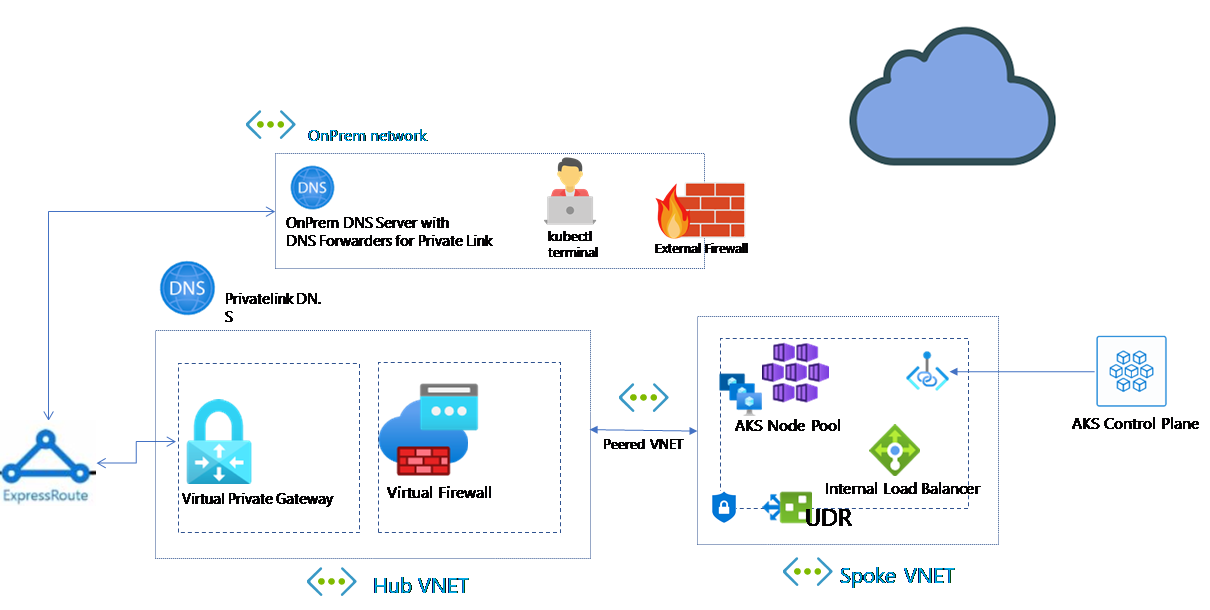
To start using Network Policies we will need to install the Calico Network Plugin. Now installing the Calico plugin may be different depending on the platform you are using and your CNI. For example for Azure AKS using Azure CNI you can have azure install Calico Plugin during the Cluster provisioning Stage with the below command
az aks create --network-policy calico --network-plugin azure
For AWS EKS Cluster using VPC CNI you can install the Calico Plugin by running the below run kubectl command
kubectl apply -f https://raw.githubusercontent.com/aws/amazon-vpc-cni-k8s/release-1.6/config/v1.6/calico.yaml
Viewing Network Policies
Network Policy is a separate API type in Kubernetes and can be viewed by simply running
$ kubectl get networkpolicies
Do note that as network Policies are namespace specific, if you are not using the default namespace you will need to add -n <namespace> to the end like below
Running this currently as you can see is returning no defined policies.
$ kubectl get networkpolicies -n montytest
No resources found in montytest namespace.
Default Deny Policy
Once we have Calico running, we can start off with the most basic Firewall Policy an Default-Deny-All Policy. By running the below YAML we can create a default deny policy.
apiVersion: networking.k8s.io/v1
kind: NetworkPolicy
metadata:
  name: deny-all
spec:
  podSelector: {}
  policyTypes:
  - Ingress
  - Egress
Saving this to a YAML file and running the command
$ kubectl apply -f default-deny.yaml -n montytest
networkpolicy.networking.k8s.io/deny-all created
$ kubectl get networkpolicies -n montytest
NAME       POD-SELECTOR   AGE
deny-all   <none>         34s
We have now deployed our first Network Policy. To test this policy lets spin up a Pod and SSH into it, I have found this is the easiest way to test out network policies and connections. A good Image to use is the buzybox with Curl installed, this is a great test image with all the basic network troubleshooting tools such as telnet, ping and curl.
$ kubectl run curl-$RANDOM --image=radial/busyboxplus:curl --rm -it --generator=run-pod/v1 --namespace montytest --limits=cpu=200m,memory=200Mi
Running this will return you a session within the container. If you run a curl google.com you will notice that it does not respond.
$ kubectl run curl-$RANDOM --image=radial/busyboxplus:curl --rm -it --generator=run-pod/v1 --namespace montytest --limits=cpu=200m,memory=200Mi
If you don't see a command prompt, try pressing enter.
[ root@curl-15357:/ ]$ curl google.com
curl: (6) Couldn't resolve host 'google.com'
[ root@curl-15357:/ ]$
To validate that it is the network policy you can delete the default-deny policy by running
$ kubectl delete networkpolicy deny-all -n montytest
networkpolicy.networking.k8s.io "deny-all" deleted
Going back into the container you should see the pod is able to ping out.
$ kubectl run curl-$RANDOM --image=radial/busyboxplus:curl --rm -it --generator=run-pod/v1 --namespace montytest --limits=cpu=200m,memory=200Mi
If you don't see a command prompt, try pressing enter.
[ root@curl-29830:/ ]$ curl google.com
<HTML><HEAD><meta http-equiv="content-type" content="text/html;charset=utf-8">
<TITLE>301 Moved</TITLE></HEAD><BODY>
<H1>301 Moved</H1>
The document has moved
<A HREF="http://www.google.com/">here</A>.
</BODY></HTML>
Allow DNS Lookups
The first thing you will notice once the default deny is added is that you can no longer do DNS lookups. DNS lookups in Kubernetes occur by pods communicating to the core-dns pod that sits in the kube-system namespace. Soo for us to enable DNS lookups we need to allow Port 53 communications from the current namespace to the kube-system namespace.
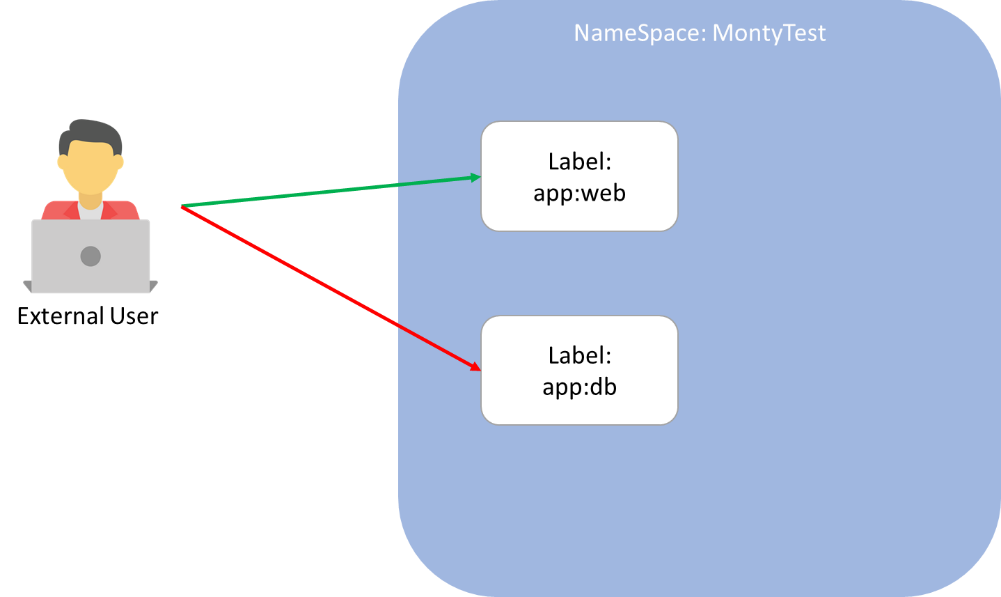
Network policy assignment is based on the label matching that can be either applied on a Pod level or on a Namespace Level.
We first start off by labelling the kube-system namespace with a label that we can refer to in a network policy.
$ kubectl label ns kube-system name=kube-system
namespace/kube-system labeled
Now we run the below Network Policy
$ kubectl apply -f -<<EOF
apiVersion: networking.k8s.io/v1
kind: NetworkPolicy
metadata:
  name: allow-dns-access
  namespace: montytest
spec:
  podSelector:
    matchLabels: {}
  policyTypes:
  - Egress
  egress:
  - to:
    - namespaceSelector:
        matchLabels:
          name: kube-system
    ports:
    - protocol: UDP
      port: 53
EOF
Lets break the above down.
The spec section as you can see defines the below:
  podSelector:
    matchLabels: {}
This is saying this policy is applying to any Pod in the namespace.
Next is policyType:
policyTypes:
  - Egress
Here we are defining this policy is only defining Egress data flow from the pod Selector being none.
Next is the policy flow itself:
  egress:
  - to:
    - namespaceSelector:
        matchLabels:
          name: kube-system
    ports:
    - protocol: UDP
      port: 53
Here we are saying allow egress to the namespace with the label n name: kube-system on Port UDP/53.
To test this policy out lets get back onto our testing Pod and do a simple nslookup, and with this policy in place you should be able to a dns lookup for google.com.
[ root@curl-25699:/ ]$ nslookup google.com
Server:    10.0.0.10
Address 1: 10.0.0.10 kube-dns.kube-system.svc.cluster.local

Name:      google.com
Address 1: 2404:6800:4006:808::200e syd09s14-in-x0e.1e100.net
Address 2: 216.58.199.46 syd09s12-in-f46.1e100.net
[ root@curl-25699:/ ]$
Allowing outbound to the selected IPs on 80 and 443 from a Pod

Now comes the fun part, allowing Pod communication. In this example we will create an Egress Policy to allow outbound communication to selected IP address on port 80 and 443.
$ kubectl apply -f -<<EOF
kind: NetworkPolicy
apiVersion: networking.k8s.io/v1
metadata:
  name: allow-egress-external
  namespace: montytest
spec:
  podSelector:
    matchLabels:
      app: web
  egress:
  - to:
    - ipBlock:
        cidr: 34.102.136.180/32
    ports:
    - port: 443
    - port: 80
EOF
Lets break this down again, firstly the pod selector is defining this policy will apply to any Pod with the label app: web
podSelector:
    matchLabels:
      app: web
Next is the Egress policy definition:
  egress:
  - to:
    - ipBlock:
        cidr: 34.102.136.180/32
    ports:
    - port: 443
    - port: 80
In the we are defining an IP Block which can be any CIDR. As you have seen in the other examples we can define either a namespace label, an ipBlock or as we will see in below example another pod Label.
kubectl get networkpolicies -n montytest
NAME                    POD-SELECTOR   AGE
allow-dns-access        <none>         2m46s
allow-egress-external   app=web        64s
deny-all                <none>         7m20s
To test this, we need to modify our test pod we have been running by adding a label to it
$ kubectl run curl-$RANDOM --image=radial/busyboxplus:curl --labels=app=web --rm -it --generator=run-pod/v1 --namespace montytest --limits=cpu=200m,memory=200Mi
If you don't see a command prompt, try pressing enter.
[ root@curl-30118:/ ]$ curl cloudhacks.blog
<!doctype html><html lang="en"><head>test site<head></html>
[ root@curl-30118:/ ]$ curl google.com
curl: (7) Failed to connect to google.com port 80: Connection timed out
Allow inbound from internet on 80
We have now managed to allow the pods to talk out to the world but what about stuff talking in. Here we are going to test creating an nginx webserver Pod and connect to it.
Lets this time start off by creating the web server. In my lab environment I am using an AKS instance soo the webserver we provision should be by default accessible over the internet.
apiVersion: apps/v1
kind: Deployment
metadata:
  name: nginx
spec:
  replicas: 3
  selector:
    matchLabels:
      app: nginx
  template:
    metadata:
      labels:
        app: nginx
        name: nginx
        type: webserver
    spec:
      containers:
      - name: nginx
        image: nginx
        ports:
        - containerPort: 80
        resources:
          requests:
            cpu: 250m
            memory: 64Mi
          limits:
            cpu: 500m
            memory: 256Mi
---
apiVersion: v1
kind: Service
metadata:
  name: external-app
spec:
  type: LoadBalancer
  ports:
  - port: 80
  selector:
    app: nginx
Running this we will eventually get a Pod with a Loadbalancer up:
$ kubectl apply -f test-external.app -n montytest
deployment.apps/nginx created
service/external-app created
$ kubectl get pods -n montytest
NAME                     READY   STATUS    RESTARTS   AGE
nginx-6ccf959445-gvvpl   1/1     Running   0          9s
nginx-6ccf959445-qk9cl   1/1     Running   0          9s
nginx-6ccf959445-tttn6   1/1     Running   0          10s
$ kubectl get svc -n montytest --watch
NAME           TYPE           CLUSTER-IP     EXTERNAL-IP   PORT(S)        AGE
external-app   LoadBalancer   10.0.232.185   20.53.72.237   80:32426/TCP   12s
kubernetes     ClusterIP      10.0.0.1       <none>         443/TCP        238d
Now lets add our magic network policy
apiVersion: networking.k8s.io/v1
kind: NetworkPolicy
metadata:
name: web-netpol
spec:
podSelector:
matchLabels:
app: nginx
policyTypes:
- Ingress
ingress:
- from: []
ports:
- port: 80
protocol: TCP
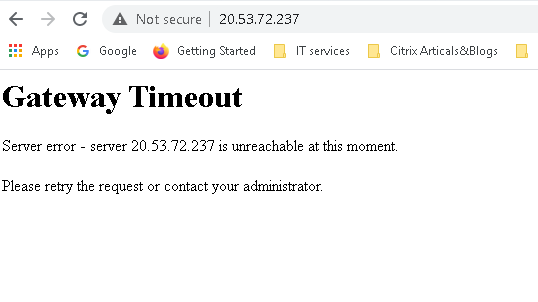
$ kubectl apply -f external-nginx-networkpolicy.yaml -n montytest
networkpolicy.networking.k8s.io/web-allow-external created
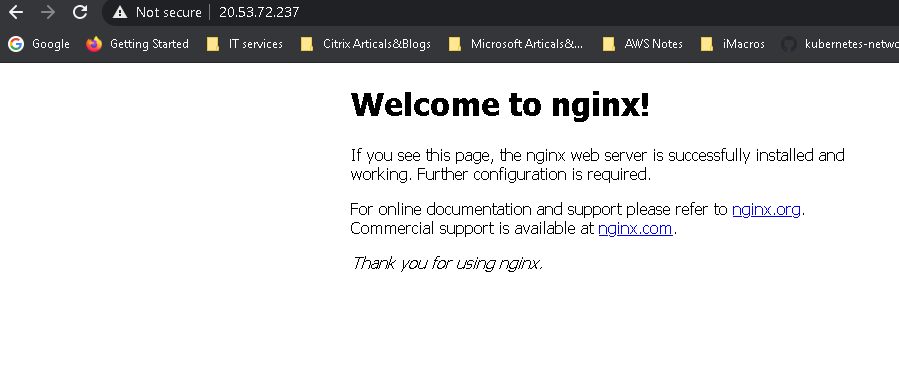
Give it a few seconds and re try our website
Allow Pod to Pod communication
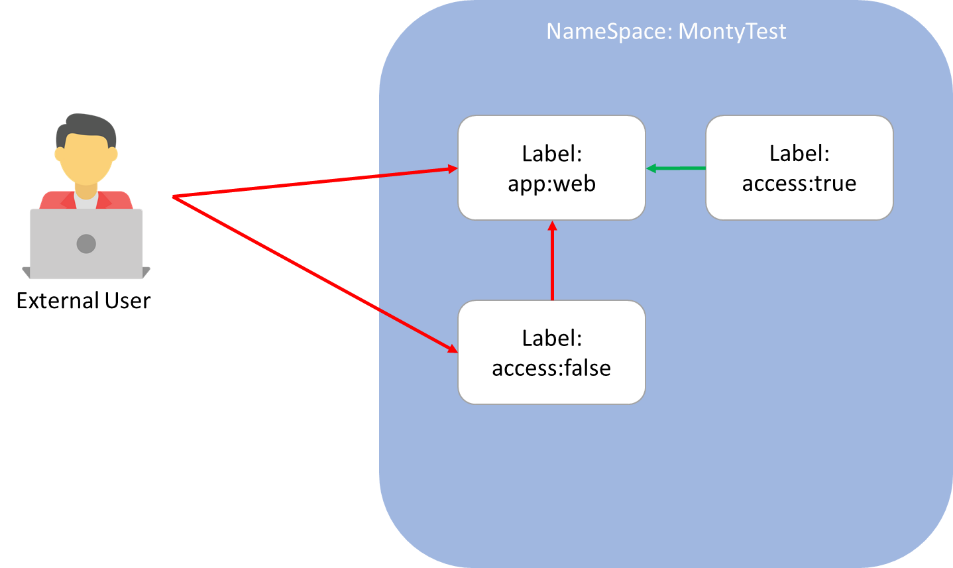
The last thing we will look at is Pod to Pod communication. Due to the fact that Network Policies are applied on a pod level and we have the default deny. Due to this we need to create two policies one to allow the source pod to communicate out to the destination pod, and another to allow the destination pod to accept the traffic.
To Create the Network Policy for ingress to allow the Web server to accept traffic
$ kubectl apply -f -<<EOF
apiVersion: networking.k8s.io/v1
kind: NetworkPolicy
metadata:
  name: access-nginx
spec:
  podSelector:
    matchLabels:
      app: nginx
  ingress:
  - from:
    - podSelector:
        matchLabels:
          access: "true"
EOF
Here we are saying apply the policy on the pod app: nginx to allow ingress from any pod with the label access: "true"
And one to allow the source Pod to send data to the destination pod.
kind: NetworkPolicy
apiVersion: networking.k8s.io/v1
metadata:
  name: allow-egress-external-from-access
spec:
  podSelector:
    matchLabels:
      access: "true"
  egress:
   - to:
     - podSelector:
        matchLabels:
          app: nginx
Here we are saying apply the policy on the pod access: "true" to allowed to send packets to the pod app: nginx
Lets test this out with our buzybox pod.
$ kubectl get pods -o wide
NAME                     READY   STATUS    RESTARTS   AGE   IP              NODE                                NOMINATED NODE   READINESS GATES
nginx-6ccf959445-6j8d8   1/1     Running   0          47m   192.168.0.109   aks-nodepool1-27351289-vmss000001   <none>           <none>
$ kubectl run curl-$RANDOM --image=radial/busyboxplus:curl --labels=access=true --rm -it --generator=run-pod/v1 --limits=cpu=200m,memory=200Mi
If you don't see a command prompt, try pressing enter.
[ root@curl-11990:/ ]$ curl 192.168.0.109
<!DOCTYPE html>
<html>
<head>
<title>Welcome to nginx!</title>
</head>
<body>
<h1>Welcome to nginx!</h1>
<p>If you see this page, the nginx web server is successfully installed and
working. Further configuration is required.</p>
</body>
</html>
here we can see a successful connection now lets try without the label.
$ kubectl run curl-$RANDOM --image=radial/busyboxplus:curl --labels=access=false --rm -it --generator=run-pod/v1 --limits=cpu=200m,memory=200Mi
If you don't see a command prompt, try pressing enter.
[ root@curl-11052:/ ]$ curl 192.168.0.109
curl: (7) Failed to connect to 192.168.0.109 port 80: Connection timed out
And as expected it failed.
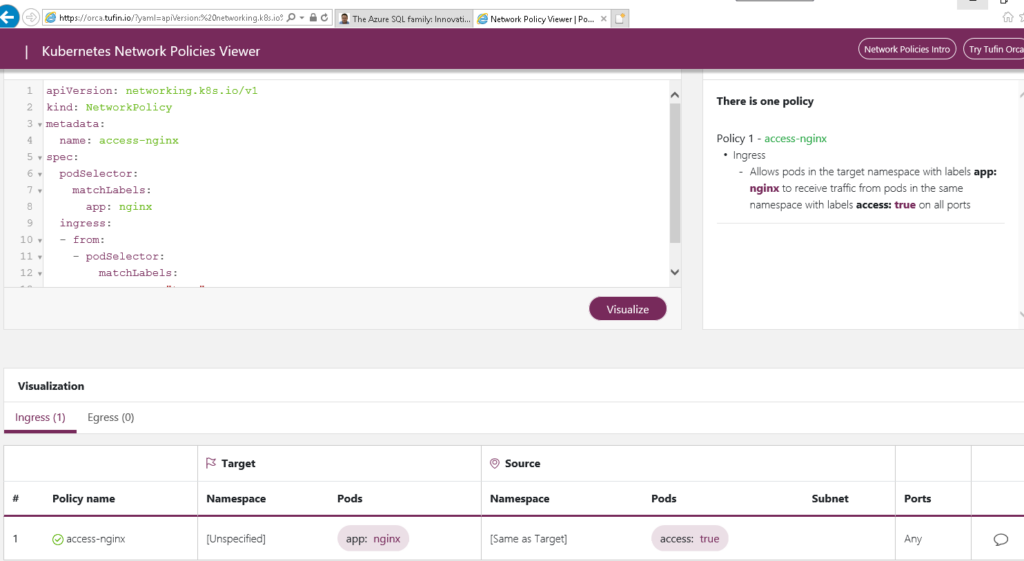
Visualising Network Policies
Now that we have played with some basic network policies, you may have realised that visulzing your policies and how they allow and deny access based on pod and namespace labels can get a bit confusing. The piece de resistance for this is a handly online network policy visualier tool
This website is a life saver if you are like me and like to visualise what you do, this website allows you to enter your Netowkr Policy YAML code and hit apply it will give you flow details on what your network policy will allow or deny. As well as details if your policy is incorrect in anyway and provide recommendations.
Whats next..
Network policies is a great first step on protecting your container environment. There is interesting conversations on who should be the one’s implementing network policies. In my personal view it should be the SecOps team who should be implementing and controlling the network policies as this is very similar to your traditional Firewalls, but skilling up and getting used to doing things in the new world can take time.
However modern cloud native apps start to draw a blur between the traditional roles of Developers, Infrastructure Engineers and Security Engineers. Before there used to be easy to use GUI interfaces for Infra or Sec Engineers to define their policies and control their systems, they now need to start learning YAML and command line code to manage their systems.
Hence I feel it should be a joint implementation between your developers and your Security team, in which Developers may write the YAML code for the network policy and the Security team police it and validate what gets implemented is compliant to their standards. (This is just my two cents, and every organisation is different)
Adding to this there is may more security implementations that can be added to compliment Network Policies, things such as Istio Service Mesh or Open Policy Agent (OPA), theses are topics we can look at in a future date. For now thanks for your time and I hope you enjoyed this.