Using vRA to provision F5 LTM vServers with a few clicks.
We use F5 LTMs a fair bit, however because F5s are such a niche technology there tends to be reluctance from F5 admins giving other administrators access to create and manage F5 vServers. To make it easier for say server admins or developers, we will look at how to make vServer provisioning a simple and a few clicks with a dummy proof vRA Form.
vRealise Automation combined with vRealise Orchestration has become my go-to orchestration platform, because its ability to integrate with almost everything via its various plugins, the same orchestration workflow you could run a PowerShell command against a windows server, an SSH script with a Unix box and execute a RESTful HTTP API with anything that supports HTTP API. It is a great platform to do almost everything.
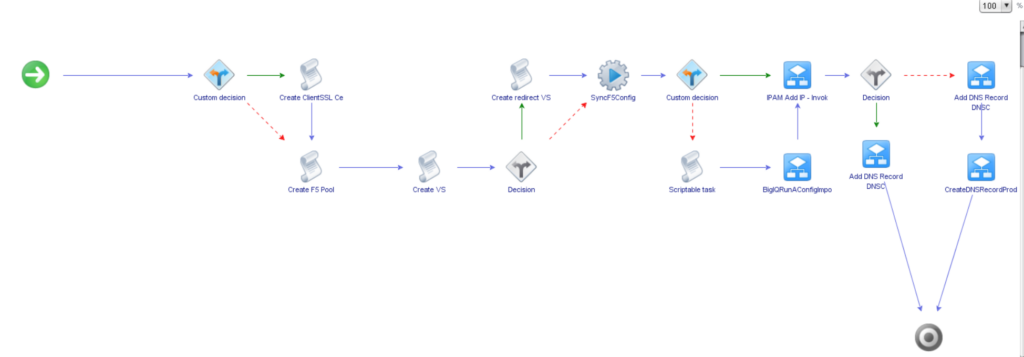
In today’s blog we will look at doing the below via a vRO Workflow.
- Request available IP from IPAM
- Create a LTM Pool with the backend server IPs
- Create a Client SSL Profile with the provided certificates
- Create a Secure https vServer as well as a http redirect vServer
- Create a DNS record on AD integrated DNS as well as Azure DNS
Soo Lets begin.
In our environment we have about 2 different F5 instances:
1. External LTM
2. Internal LTM
Getting an IP from IPAM, in this instance we are using Microsoft IPAM 2016 which is a free IPAM system available with Windows Server 2012+ for more details on this please check out this link. On our IPAM instance we have pre-reserved IP ranges from subnets for each of the different F5 instances.
To make this easier for the end user we want to go to IPAM and reserve an available IP address, this can be achieved by a simple PowerShell command we will start off by creating an Action which will execute a PowerShell script on the IPAM Server finding the next available IP and returning it in the form.
if (F5InstanceHost.name == "F5-Int" && Partitions == "Common")
    {
    IPAMstartIP = "10.0.100.50"
    IPAMendIP = "10.0.100.100"

    }
else if (F5InstanceHost.name == "F5- Ext" && Partitions == "Common")
    {
    IPAMstartIP = "x.x.x.10"
    IPAMendIP = "x.x.x.30"
    }
var psScript = ''
psScript +='$StartAddress = "' + IPAMstartIP + '"\n';
psScript +='$EndAddress = "' + IPAMendIP + '"\n';
psScript +='\n';
psScript +='$IP = Get-IpamRange -StartIPAddress $StartAddress -EndIPAddress $EndAddress | Find-IpamFreeAddress\n';
psScript +='$IP.IpAddress.IPAddressToString\n';
var sessionId = System.getModule("com.vmware.library.powershell").openSession(psHost) ;
var PSOutput = System.getModule("com.vmware.library.powershell").invokeScript(psHost,psScript,sessionId) ;
System.getModule("com.vmware.library.powershell").closeSession(psHost,sessionId) ;
return PSOutput.getRootObject();
}
else
{
return "
Now let us start looking at our REST API Calls to the F5. The F5 has its own RESTful HTTP API interface known as iControl. F5 introduced this API interface from v11 and has become very useful for a full list of their API you can check our their documentation here.
There are a few APIs we will look at today.
Listing available Partitions: Although in most cases you may just use the Common Parition, sometimes that may not be the case, the Request URI is
GET /tm/sys/folder
And to do this in vRO:
//prepare request

var requestURI = "/tm/sys/folder"
var requestMethord = "GET";
var request = restHost.createRequest(requestMethord,requestURI);
//set the request content type
request.contentType = "";
System.log("Request: " + request);
System.log("Request URL: " + request.fullUrl);

//execute request
var response = request.execute();
//prepare output parameters
System.log("Response: " + response);
statusCode = response.statusCode;
statusCodeAttribute = statusCode;
System.log("Status code: " + statusCode);
contentLength = response.contentLength;
headers = response.getAllHeaders();
contentAsString = response.contentAsString;
System.log("Content as string: " + contentAsString);
var resJSON = JSON.parse(contentAsString);
var Paritions = resJSON.items
var partitionList = new Array ()
//var json = =
for each ( var item in Paritions )
{
 partitionList.push (item.name)
    System.log(item.name)
}
return partitionList
Getting Available Certs and Keys on the F5
To get a list of certs and Keys which you will use as your input to create the Client SSL Profile, we run the below two API calls
GET /tm/sys/crypto/cert
GET /tm/sys/crypto/key
In vRO this will look like
/prepare request
//Do not edit
var requestURI = "/tm/sys/crypto/cert"
var requestMethord = "GET";
var request = restHost.createRequest(requestMethord,requestURI);
//set the request content type
request.contentType = "";
System.log("Request: " + request);
System.log("Request URL: " + request.fullUrl);

var response = request.execute();

//prepare output parameters
System.log("Response: " + response);
statusCode = response.statusCode;
statusCodeAttribute = statusCode;
System.log("Status code: " + statusCode);
contentLength = response.contentLength;
headers = response.getAllHeaders();
contentAsString = response.contentAsString;
System.log("Content as string: " + contentAsString);
var resJSON = JSON.parse(contentAsString);
var Certs = resJSON.items
var CertList = new Array ()

for each ( var item in Certs )
{

 CertList.push (item.fullPath)
    System.log(item.fullPath)

}
return CertList
Get Key:
//prepare request
//Do not edit

var requestURI = "/tm/sys/crypto/key"
var requestMethord = "GET";
//var restOpeartion = restHost.getOperation();
var request = restHost.createRequest(requestMethord,requestURI);
//set the request content type
request.contentType = "";
System.log("Request: " + request);
System.log("Request URL: " + request.fullUrl);

var response = request.execute();
//prepare output parameters
System.log("Response: " + response);
statusCode = response.statusCode;
statusCodeAttribute = statusCode;
System.log("Status code: " + statusCode);
contentLength = response.contentLength;
headers = response.getAllHeaders();
contentAsString = response.contentAsString;
System.log("Content as string: " + contentAsString);
var resJSON = JSON.parse(contentAsString);
var Certs = resJSON.items
var CertList = new Array ()

for each ( var item in Certs )
{

 CertList.push (item.fullPath)
    System.log(item.fullPath)

}
return CertList
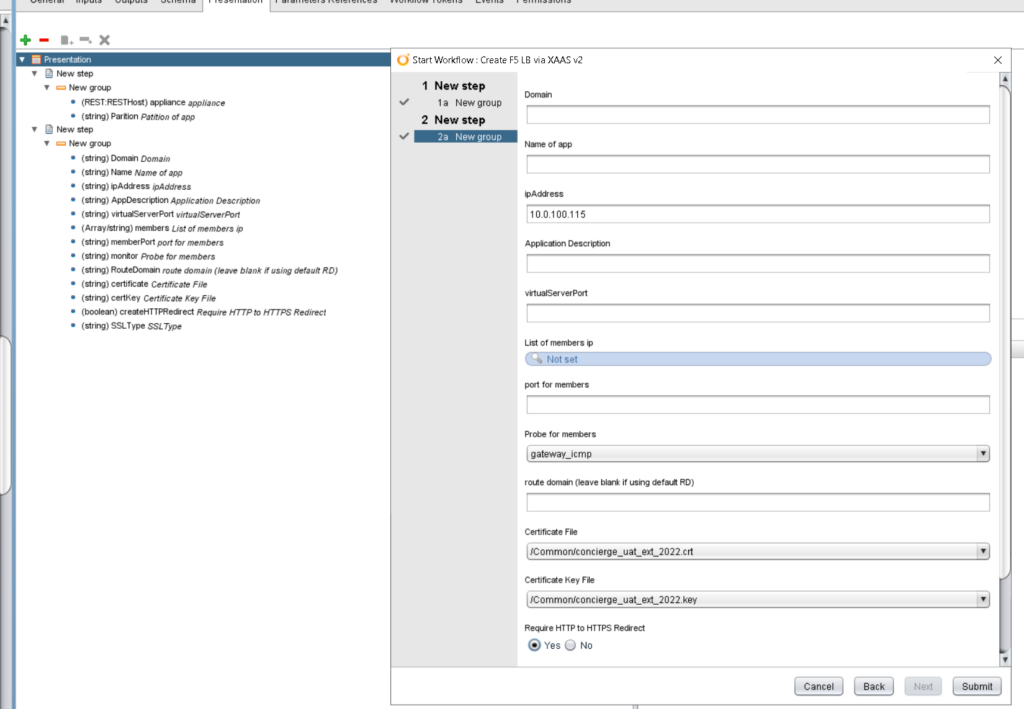
Now we have our system generated inputs to create load balancer VIP, we have our IP Address, our Parition, our Cert/Key pair and our F5 appliance. The remaining details such as application name, domain, backend IPs and Ports will become user inputs.
Creating the ClientSSL Profile:
The command and Body for a Client SSL Profile needs to look like:
POST /tm/ltm/profile/client-ssl
{
    "name": "<Client-SSL-name>",
    "partition": "Common",
    "key": "/Common/<keyname>.key",
    "cert": "/Common/<certname>.crt",
    "defaultsFrom": "/Common/clientssl”
}
In vRO this will look like:
//prepare request
//Do not edit

var content
//Define the Disable String
var contentString = '{';
contentString += '"name":"'+Name+'_'+Domain.replace('.','_')+'_clientssl_'+Parition+'",'
contentString += '"partition":"'+Parition+'",';
contentString += '"key":"'+certKey+'",';
contentString += '"cert":"'+certificate+'",';
contentString += '"defaultsFrom":"/Common/clientssl-high-secure"';
contentString += '}'

System.log(contentString)
var requestURI = "/tm/ltm/profile/client-ssl"
var requestMethord = "POST";
var request
var response

request = appliance.createRequest(requestMethord,requestURI,contentString);
//set the request content type
request.contentType = "application/json";
System.log("Request: " + request);
System.log("Request URL: " + request.fullUrl);

//Customize the request here

response = request.execute();
System.log("Response: " + response);
statusCode = response.statusCode;
statusCodeAttribute = statusCode;
System.log("Status code: " + statusCode);
contentLength = response.contentLength;
headers = response.getAllHeaders();
contentAsString = response.contentAsString;
System.log("Content as string: " + contentAsString);

if ( statusCodeAttribute >= 400 ) {
    throw "HTTPError: status code: " + statusCodeAttribute;
} else {
    SSLClientProfile = Name+'_'+Domain.replace('.','_')+'_clientssl_'+Parition

}
Creating a Pool and adding Pool Member:
Here we are going to run the below API Call
POST /tm/ltm/pool
and our body should look like below:
{
    "name": "<vServer Pool Name>",
    "partition": "Common",
    "description": "<PoolDescription>",
    "members": [
        {
            "name": "<ServerName>:<port>",
            "address": "<serverIp>"
        }
    ],
    "monitor": "<probe>"
}
In vRO our code will look like below:
//prepare request
//prepare request
//Do not edit
var content

OwnerADGroup = "AU_SEC_F5_" + Name

var contentString = '{';
contentString += '"name":"P_' + Name + '_' + Domain.replace('.', '_') + '_' + memberPort + '_' + Parition + '",'
contentString += '"partition":"' + Parition + '",';
contentString += '"description":"<PoolDescription><Owner>' + OwnerADGroup + '</Owner><AppDescription>' + Description + '</AppDescription> </PoolDescription>",';

for (i = 0; i < members.length; i++) {
    contentString += '"members":[{"name":"' + members[i] + ':' + memberPort + '","address":"' + members[i] + RouteDomain + '"}],';
}
contentString += '"monitor":"' + monitor + '"';
contentString += '}';

System.log(contentString)
var requestURI = "/tm/ltm/pool"
var requestMethord = "POST";
var request
var response

//var restOpeartion = restHost.getOperation();
request = appliance.createRequest(requestMethord, requestURI, contentString);
//set the request content type
request.contentType = "application/json";
System.log("Request: " + request);
System.log("Request URL: " + request.fullUrl);

response = request.execute();
//prepare output parameters
System.log("Response: " + response);
statusCode = response.statusCode;
statusCodeAttribute = statusCode;
System.log("Status code: " + statusCode);
contentLength = response.contentLength;
headers = response.getAllHeaders();
contentAsString = response.contentAsString;
System.log("Content as string: " + contentAsString);

if (statusCodeAttribute >= 400) {
    throw "HTTPError: status code: " + statusCodeAttribute;
} else {


}
In the Pool Description you may see that we are adding some custom XML Tags and variables such as AD Group. We are going to use this in Part 2 of this series and show how we can provide access to application owners to self manage their own vServers post provisioning via vRA.
Now we have our ClientSSL and Pool created next is to create the vServer itself, taking all of these as the input to create our vServer we will execute the below API Call.
POST /tm/ltm/virtual
With the body:
{
    "name": "<vServerName>",
    "partition": "Common",
    "destination": "<virtualIP>:<listeningPort>",
    "sourceAddressTranslation": {
        "type": "automap"
    },
    "ipProtocol": "tcp",
    "persist": "/Common/source_addr",
    "profiles": "/Common/http",
    "profiles": "/Common/<ClientSSLProfile>",
    "profiles": "/Common/serverssl",
    "pool": "/Common/<PoolName>"
}
In vRO this looks like:
var content
var contentString = '{';
contentString += '"name":"V_' + Name + '_' + Domain.replace('.', '_') + '_' + virtualServerPort + '_' + Parition + '",'
contentString += '"partition":"' + Parition + '",';
contentString += '"destination":"' + ipAddress + RouteDomain + ':' + virtualServerPort + '",';
contentString += '"sourceAddressTranslation":{"type":"automap"},';
contentString += '"ipProtocol":"tcp",';
contentString += '"persist":"/Common/source_addr",';
if (SSLType == "SSL Offloading") {
    contentString += '"profiles":"/Common/http",'
    contentString += '"profiles":"/' + Parition + '/' + SSLClientProfile + '",'
} else if (SSLType == "SSL Interception") {
    contentString += '"profiles":"/Common/http",'
    contentString += '"profiles":"/' + Parition + '/' + SSLClientProfile + '",'
    contentString += '"profiles":"/Common/serverssl",'

}
contentString += '"pool":"/' + Parition + '/' + PoolName + '"';
contentString += '}';

System.log(contentString)
var requestURI = "/tm/ltm/virtual"
var requestMethord = "POST";
var request
var response

request = appliance.createRequest(requestMethord, requestURI, contentString);
//set the request content type
request.contentType = "application/json";
System.log("Request: " + request);
System.log("Request URL: " + request.fullUrl);

response = request.execute();
System.log("Response: " + response);
statusCode = response.statusCode;
statusCodeAttribute = statusCode;
System.log("Status code: " + statusCode);
contentLength = response.contentLength;
headers = response.getAllHeaders();
contentAsString = response.contentAsString;
System.log("Content as string: " + contentAsString);
if (statusCodeAttribute >= 400) {
    throw "HTTPError: status code: " + statusCodeAttribute;
}
Now we have created our vServer on the F5, if you are running HA F5s you will want to sync this config to the secondary node, this is easy enough, we first need to find the Sync Group and then run a sync, this is achieved with the below action:
var requestURI = "/tm/cm/device-group"
var requestMethord = "GET";
var request = restHost.createRequest(requestMethord, requestURI);
request.contentType = "";
System.log("Request: " + request);
System.log("Request URL: " + request.fullUrl);

//execute request
//Do not edit
var response = request.execute();
//prepare output parameters
System.log("Response: " + response);
statusCode = response.statusCode;
statusCodeAttribute = statusCode;
System.log("Status code: " + statusCode);
contentLength = response.contentLength;
headers = response.getAllHeaders();
contentAsString = response.contentAsString;
System.log("Content as string: " + contentAsString);
var resJSON = JSON.parse(contentAsString);
var deviceGroups = resJSON.items
var SyncGroupsList = new Array()
//var json = =
for each( var item in deviceGroups )
{
    if (item.type == "sync-failover") {
        SyncGroupsList.push(item.name)
        System.log(item.name)
    }
}

var contentString = '{';
contentString += '"command":"run"'
contentString += '}';

for each(item in SyncGroupsList)
{
        requestURI = "/tm/cm/config-sync?options=to-group%20" + itemrequestMethord = "POST";

        request = restHost.createRequest(requestMethord, requestURI, contentString);
        //set the request content type
        request.contentType = "application/json";
        var response = request.execute();
        //prepare output parameters
        System.log("Response: " + response);
        statusCode = response.statusCode;
        statusCodeAttribute = statusCode;
        System.log("Status code: " + statusCode);
        contentLength = response.contentLength;
        headers = response.getAllHeaders();
        contentAsString = response.contentAsString;
        System.log("Content as string: " + contentAsString);

}
Last but not least, we need to create our DNS entry depending on what you use as your DNS Server this may change, in our instance we are using a simple AD Managed DNS Server soo we were able to run a simple DNSCMD Command to create the DNS entry:
var psScript = ''
psScript +='dnscmd "' + DNSServer + '" /RecordAdd "' + DNSdomain + '" "' + DNShostname + '" A "' + IPAddress + '"\n';
psScript +='Resolve-DnsName -Name "' + DNShostname + '" | Select IPAddress\n';
script = psScript;
At the end of all of this we have our Workflow created and ready to run.
I hope you enjoyed this and hope this may become useful. If any questions please feel free to comment below.
And stay tuned for part 2 of this which is enabling developers to self manage their own vServers via vRA.