Provisioning Kubernetes clusters in public cloud is a common request I get. Spinning one up is not hard there are heaps of documentations and tools out there to build them. And developers will tend to just create their own Infra as Code to deploy a cluster. But it is important to note Kubernetes clusters are not secure by default we need to add our own policies and guardrails to protect the application we run.
Hence today we are going to look at how we can use vRA to templatise provision an EKS Cluster in an AWS Account and add the relevant security and configurations to make the cluster secure. And how we can make this available to developers to request their own cluster ready for them to use.
The automation we are going to create today will basically use vRO to execute a bash script running three main tools, to provision and secure a cluster.
Lets explore the tools we are going to use first.
1) AWS CLI : This is a very common toolset that is used to interface with AWS via command line, details on this is available here.
2) kubectl: I don’t think I need to introduce this tool, but this is our toolset used to interface with the Kubernates API Server
3) eksctl: this is the main toolset we will use to provision the EKS Cluster. The eksctl is a project that is branched off from AWS which allows a command line interface to provision and manage EKS Clusters. Although you can use AWS CLI to do the same thing, the benefit of eksctl is that in the backend the commands you execute creates a CloudFormation template which enable a more declarative deployment and easy lifecycle management. More information on eksctl can be found on the project page here.
The Code
Our deployment aims to complete the following tasks
- Login to AWS Account using access token and insure account has access
- Create the EKS Cluster based on if it is a private cluster or a public cluster
- Apply EKS controls including, private endpoint, limiting public endpoint and enabling logging
- Attaching trusted Container Registry
- Installing TwistLock which is used for runtime image scanning
- Installing Calico Plugin and enabling default deny network policy
- Clean up our session ready for the next automation attempt
Logging onto AWS.
aws configure set aws_access_key_id $CLIENTID
aws configure set aws_secret_access_key $CLIENTSECRET
Using AWS CLI we will configure our session to authenticate to an AWS Account with the user provided clientid and secret. This account will be the the default EKS admin soo keep this account details safe.
Creating the EKS Cluster
if [ $PRIVATE = "true" ]
then
        eksctl create cluster --vpc-private-subnets=$SUBNET1,$SUBNET2 --node-private-networking --instance-prefix $CLUS_NAME- --managed --nodes $NODE_COUNT --node-type $NODESIZE --region $LOCATION --name $CLUS_NAME --instance-name $CLUS_NAME
else
        eksctl create cluster --vpc-public-subnets=$SUBNET1,$SUBNET2 --instance-prefix $CLUS_NAME- --managed --nodes $NODE_COUNT --node-type $NODESIZE --region $LOCATION --name $CLUS_NAME --instance-name $CLUS_NAME
fi
Here we have two options.
- If we want a private EKS cluster that is internal, for this you will need to make sure you have a NAT gateway or transit gateway provisioned to allow your nodes to talk to the EKS Control plane. This is defined by stating –
-vpc-private-subnets=$SUBNET1,$SUBNET2 --node-private-networkingand providing two subnets as minimum - For Public EKS Clusters you need to provide public subnets which have internet gateway deployed on which makes the Subnet to be public.
Other settings we are defining are the node details we are stating that the nodes are EKS managed EC2 instance soo they will be added as EKS node pool and hence we are defining the number of nodes for EKS to create and the EC2 instance type (eg m5.large), other basic details we are detailing are the region, clustername, etc.
If you run the eksctl script on its own you will actually see in the AWS Account it creates a cloud formation template which goes and deploys your EKS Cluster and the Node Pool

Applying Harding to the EKS Cluster
Here we are going to harden the EKS Cluster by
1) enabling private endpoint for internal access to the K8s API Server
eksctl utils update-cluster-endpoints --region=$LOCATION --cluster=$CLUS_NAME --private-access=true --approve2) Locking down the pubic access of the K8s API Server to trusted IP address
eksctl utils set-public-access-cidrs --region=$LOCATION --cluster=$CLUS_NAME 105.22.15.33/32 --approve3) Enable logging of the cluster to CloudWatch and CloudTrail
eksctl utils update-cluster-logging --region=$LOCATION --cluster=$CLUS_NAME --approve --enable-types allAdding Trusted Container Registry
We want to insure that developers have access to our trusted registry which has approved and vulnerability free images. In our instance we are using Azure Container Registry (ACR) as our default registry, soo we will add this to our docker registry configuration inside our cluster. (Note we could have used AWS Elastic Container Registry (ECR) as well)
ACR="montytestprd.azurecr.io"
kubectl create secret docker-registry $ACR --docker-server $ACR --docker-username=$ACRSPN --docker-password $ACRSPNSecret
We request the user to input the Azure SPN details in and insure that their SPN has permissions to pull images from the ACR.
Installing Network Policy
We now need to secure any pods that will be run on this cluster soo we are going to install Calico plug in and enable a default-deny network policy in the default namespace.
kubectl apply -f https://raw.githubusercontent.com/aws/amazon-vpc-cni-k8s/release-1.6/config/v1.6/calico.yaml
kubectl create -f https://raw.githubusercontent.com/kubernetes/website/master/content/en/examples/service/networking/network-policy-default-deny-all.yaml
Installing Twistlock
Twistlock (now called Prisma Compute) is an industry trusted product which is capable of scanning containers and images for vulnerabilities, compliance issues, and runtime protection. Twist lock provides a deamonset which runs on the K8s cluster and activity scans and monitors the containers, we will install this inside our cluster as well.
kubectl create namespace twistlock
TWISTLOCKYAML="/var/scripts/twistlock_deploy_montytestprdReg_eks.yaml"
kubectl apply -f $TWISTLOCKYAML
Cleanup SSH Session ready for the next user.
Last thing we are going to do is just remove the connection details of the new cluster from our automation server soo we have it clean of any login details and ready for the next session.
kubectl config delete-context $USERID@$CLUS_NAME.$LOCATION.eksctl.io
kubectl config delete-cluster $CLUS_NAME.$LOCATION.eksctl.io
rm ~/.aws/credentials
Final Script
At the end of all, of this our whole script will look like below:
$ cat create-eks-vra.sh
ACCOUNTID=$1
CLIENTID=$2
CLIENTSECRET=$3
ENVIRONMENT=$4
CLUS_NAME=$5
NODE_COUNT=$6
LOCATION=$7
NODESIZE=$8
ACRSPN=${9}
ACRSPNSecret=${10}
PRIVATE=${11}
SUBNET1=${12}
SUBNET2=${13}

aws configure set aws_access_key_id $CLIENTID
aws configure set aws_secret_access_key $CLIENTSECRET

 ACR="montytestprd.azurecr.io"
TWISTLOCKYAML="/var/scripts/twistlock_deploy_montytestprdReg_eks.yaml"

if [ $PRIVATE = "true" ]
then
        eksctl create cluster  --vpc-private-subnets=$SUBNET1,$SUBNET2 --node-private-networking --instance-prefix $CLUS_NAME- --managed --nodes $NODE_COUNT --node-type $NODESIZE --region $LOCATION --name $CLUS_NAME --instance-name $CLUS_NAME
else
        eksctl create cluster  --vpc-public-subnets=$SUBNET1,$SUBNET2 --instance-prefix $CLUS_NAME- --managed --nodes $NODE_COUNT --node-type $NODESIZE --region $LOCATION --name $CLUS_NAME --instance-name $CLUS_NAME
fi

eksctl utils update-cluster-endpoints --region=$LOCATION --cluster=$CLUS_NAME --private-access=true --approve
eksctl utils set-public-access-cidrs --region=$LOCATION --cluster=$CLUS_NAME 105.22.15.33/32 --approve
eksctl utils update-cluster-logging --region=$LOCATION --cluster=$CLUS_NAME --approve --enable-types all

kubectl create namespace twistlock
kubectl create secret docker-registry $ACR --docker-server $ACR --docker-username=$ACRSPN --docker-password $ACRSPNSecret --namespace twistlock
kubectl create secret docker-registry $ACR --docker-server $ACR --docker-username=$ACRSPN --docker-password $ACRSPNSecret
echo "Enabling Default Deny Network policy"

kubectl apply -f $TWISTLOCKYAML
kubectl apply -f https://raw.githubusercontent.com/aws/amazon-vpc-cni-k8s/release-1.6/config/v1.6/calico.yaml
kubectl create -f https://raw.githubusercontent.com/kubernetes/website/master/content/en/examples/service/networking/network-policy-default-deny-all.yaml

USERID=$(aws iam get-user | grep -Po '"UserName":.*?[^\\]",'|awk -F'"' '{print $4}')

kubectl get nodes -o name

kubectl config delete-context $USERID@$CLUS_NAME.$LOCATION.eksctl.io
kubectl config delete-cluster $CLUS_NAME.$LOCATION.eksctl.io
rm ~/.aws/credentials
We will reference this script via vRO to the SSH Script on our SSH Host:

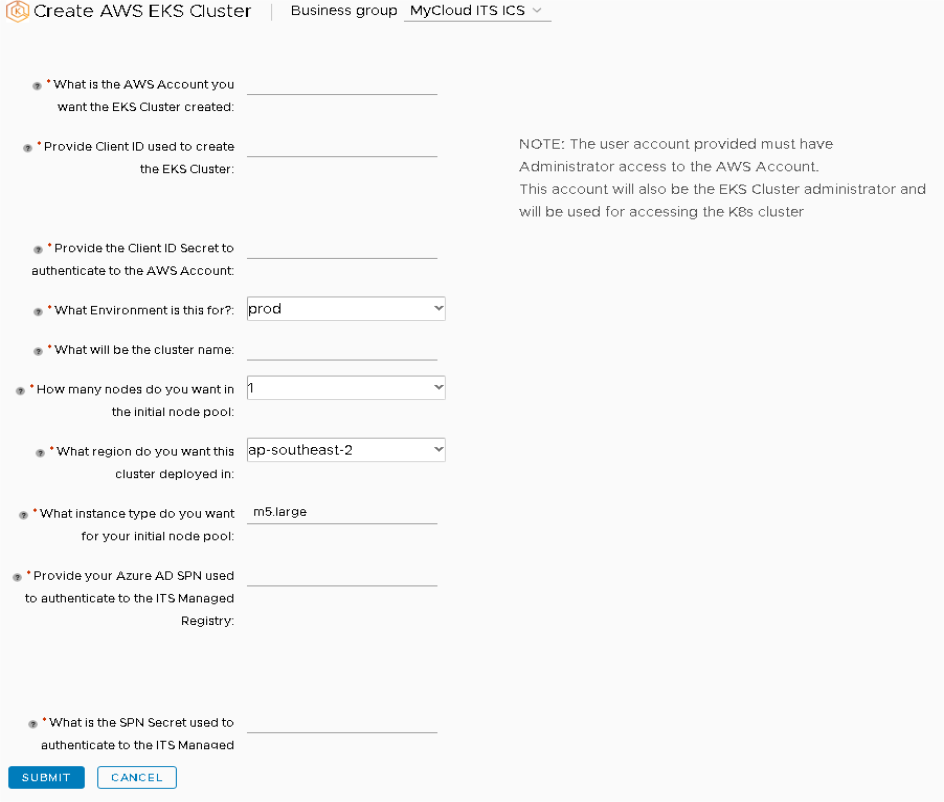
And we have now just made an easy to use form to request and provision an EKS cluster in any AWS Account.
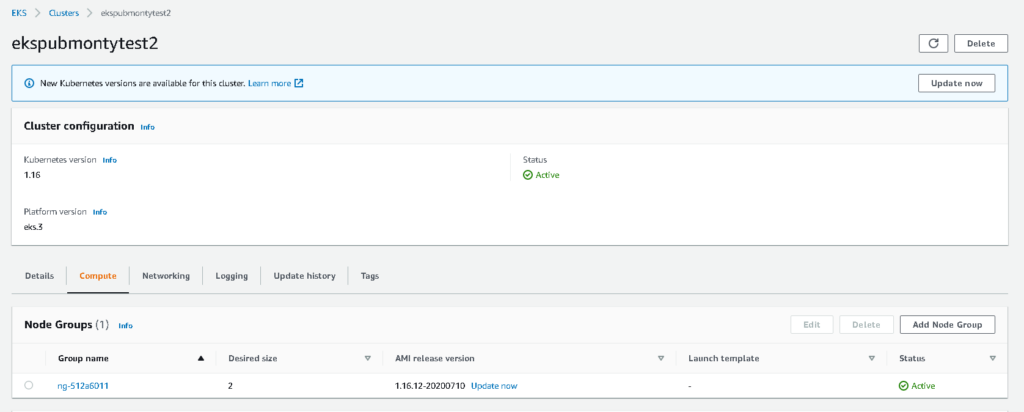
After running this the end result is an EKS Cluster ready for you to use
Hope you enjoyed this post and as usual please add your comments below.